 API-FOOTBALL
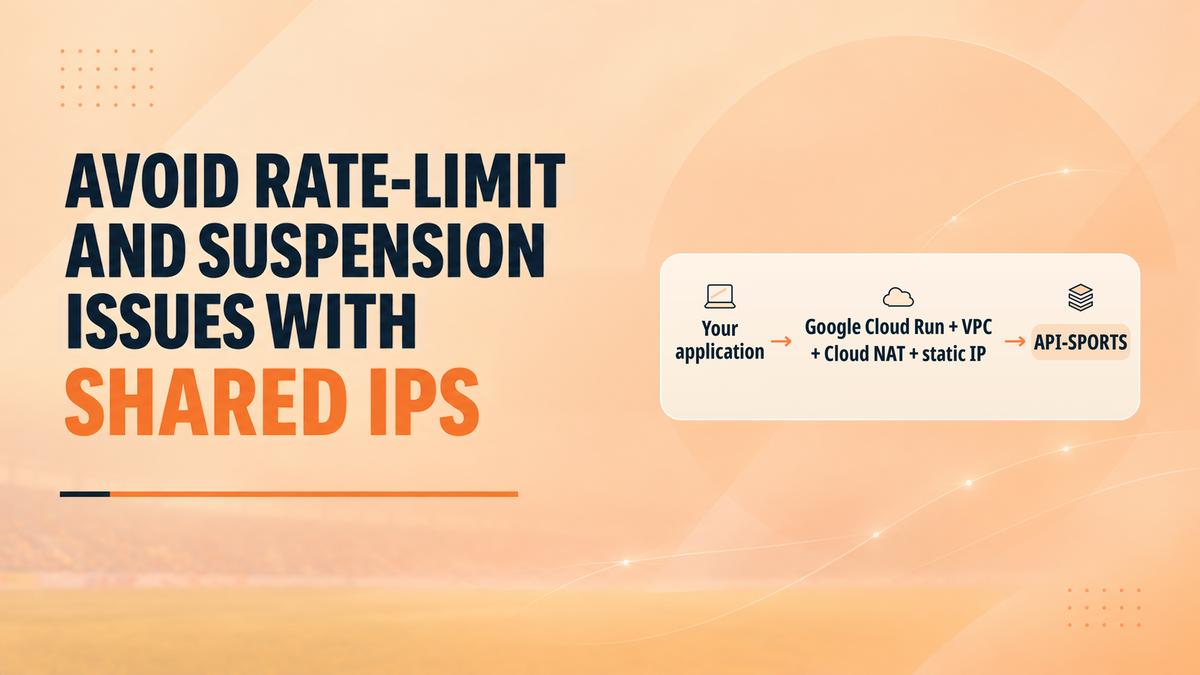
If you receive the following error:
Too many requests. You have exceeded the limit of requests per minute of your subscription.
This does not necessarily mean that your API key has reached the requests-per-minute limit of your subscription.
The problem may come from the public IP address used by your application. Serverless platforms, cloud services, and shared hosting environments often route requests from multiple customers through the same outbound IP address. This shared infrastructure can trigger network protections against excessive requests. It can also lead to the automatic suspension of an account using the Free plan.
This guide explains why these situations occur and how to route API-SPORTS requests through a dedicated static outbound IP address, without moving the rest of your application. It presents a complete configuration with Google Cloud Run as well as an alternative solution with Cloudflare Zero Trust Enterprise.
Why shared outbound IPs can cause problems
Platforms such as Vercel, Cloudflare Workers, Supabase Edge Functions, Render, Railway, AWS Lambda, Google Cloud Run, or Firebase may use IP addresses shared between multiple customers. The same situation can occur with VPNs, proxies, and shared hosting environments.
Your application may follow this path:
Your application → shared provider IP → API-SPORTS
At the same time, other API-SPORTS users may be using this address:
Other users → same shared provider IP → API-SPORTS
From a network perspective, all this traffic comes from the same public address.
Rate-limit errors
API-SPORTS applies protections at both the API-key and network levels.
Your key may still have requests available while the shared public IP address is already generating significant traffic from other users. Network protections may then be triggered before your key reaches its own limit.
This is why a rate-limit error may appear even though your dashboard still shows available requests.
Free plan suspensions
Shared outbound IP addresses can also affect accounts using the Free plan.
These accounts are protected against the abusive creation of multiple accounts. If several API-SPORTS accounts are detected behind the same public IP address, the system may interpret this situation as multi-account activity.
With shared infrastructure, this can happen even if you have personally created only one account. For example, requests from an application running with Supabase Edge Functions may use the same outbound IP address as those of other API-SPORTS users. The protections may then detect several Free accounts behind this address and automatically suspend the account.
Creating another account does not solve the problem if requests continue to originate from the same shared IP address.
Recommended solution
The most reliable solution is to send API-SPORTS requests from a static outbound IP address dedicated to your own traffic.
The address must not be shared with users unrelated to your infrastructure. A static address that remains shared can cause the same problems.
You do not need to move your entire application. Your frontend, database, and backend can remain with their current provider. Only requests sent to API-SPORTS need to pass through a dedicated egress service.
The general architecture then becomes:
Your application → dedicated egress service → API-SPORTS
The rest of the traffic can continue to use your usual infrastructure.
You can use a small VPS with its own public address, a static egress option offered by your hosting provider, or a cloud service configured with a dedicated outbound IP address. The following example uses Google Cloud Run because Google provides official documentation for this configuration.
Step-by-step example with Google Cloud Run
The objective is to create the following path:
Your application → Cloud Run proxy → API-SPORTS
Behind Cloud Run, outbound requests will follow this route:
Cloud Run → VPC → Cloud NAT → static IP → API-SPORTS
Your existing application can remain on Vercel, Supabase, Cloudflare, or another provider. Only API-SPORTS requests will use the Cloud Run proxy.
Before you begin
You must have an API-SPORTS key, an active Google Cloud account, and a terminal that can run a curl command.
When you open the Google Cloud documentation, you can click Start free if you do not already have an account. Google then requests personal and payment information before allowing you to create resources.
When this tutorial was created, the registration screen indicated a $300 credit valid for 90 days and specified that no automatic charges would be applied without upgrading to a full account with pay-as-you-go billing or choosing prepayment. No amount was charged during our test, and the resources used were covered by the promotional credits.
These conditions may change, and the cost depends on the resources used, the traffic, and how long they run. Check Google Cloud pricing, your credit balance, and your billing settings before leaving the resources running over time.
Once the account is active, create a New project. You can choose its name. In this guide, we use: API-SPORTS.
Make sure this project is selected in the Google Cloud top bar before continuing. The VPC, subnet, IP address, Cloud NAT, Cloud Router, and Cloud Run service must be created in this same project.
Important rule: use the same region throughout the configuration. In this example, all regional resources use
europe-west1. A region mismatch may prevent resources from being selected or connected.
Step 1: Create a VPC network
Make sure the API-SPORTS project is selected. In the search bar at the top of the Google Cloud console, enter VPC network, then select the corresponding product.
Google Cloud may ask you to enable the Compute Engine API. This request does not appear if the API is already active in the project. If it is displayed, click the activation button and wait for the operation to complete. This API is required to create network resources such as the VPC, the static IP address, and Cloud NAT.
You should then arrive at the VPC network management interface.
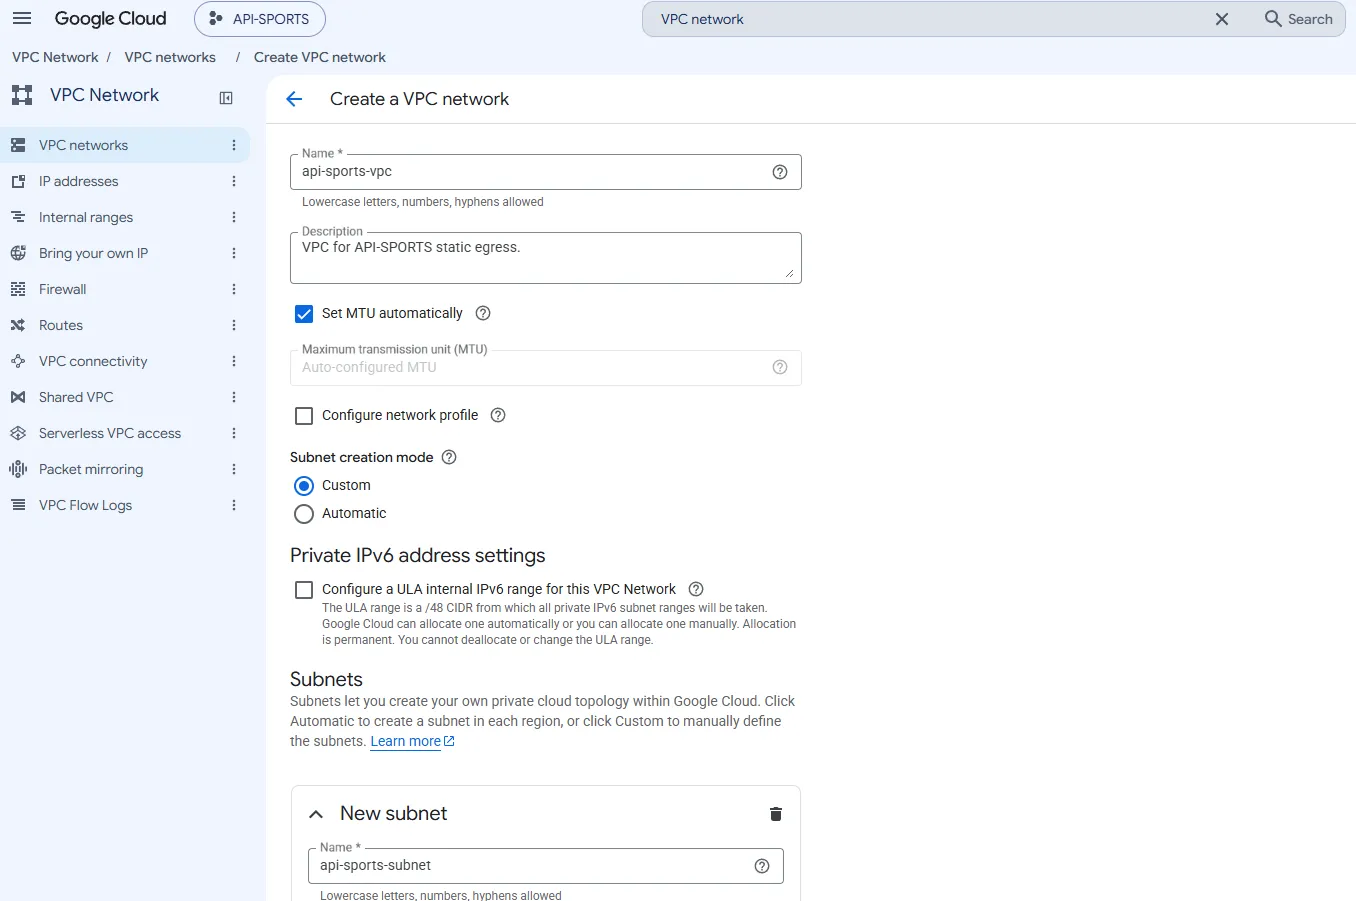
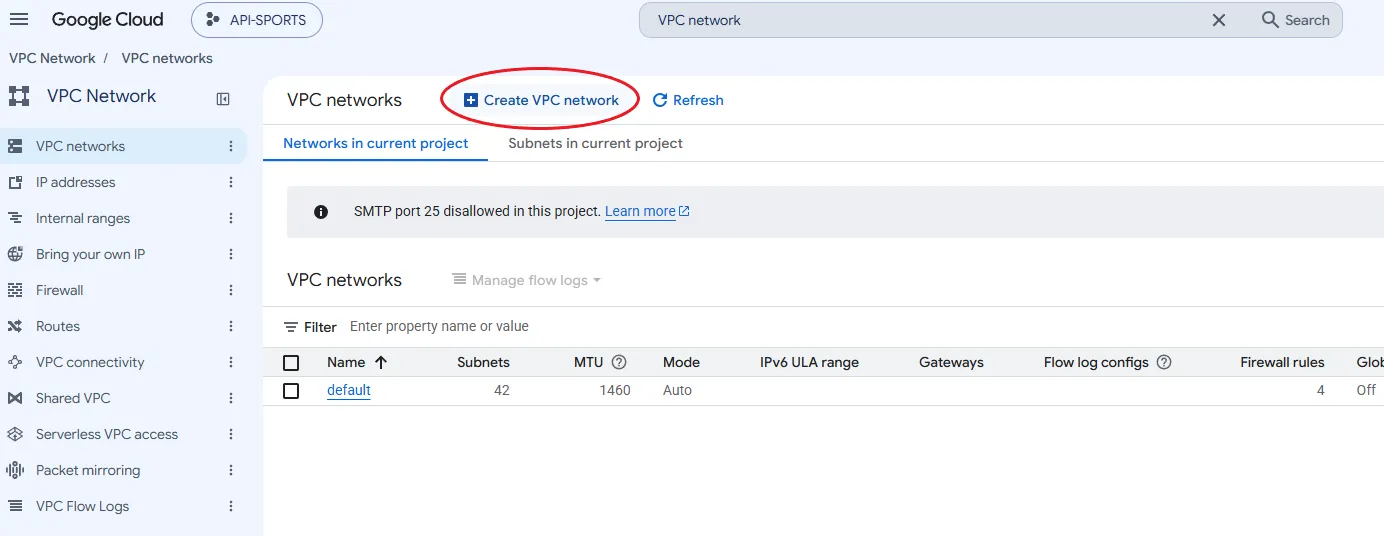 Click Create VPC network, then complete the network’s general settings:
| Field | Value |
|---|---|
| Name | api-sports-vpc |
| Description | VPC for API-SPORTS static egress. |
| Set MTU automatically | Enabled |
| Configure network profile | Disabled |
| Subnet creation mode | Custom |
| Configure private IPv6 | Disabled |
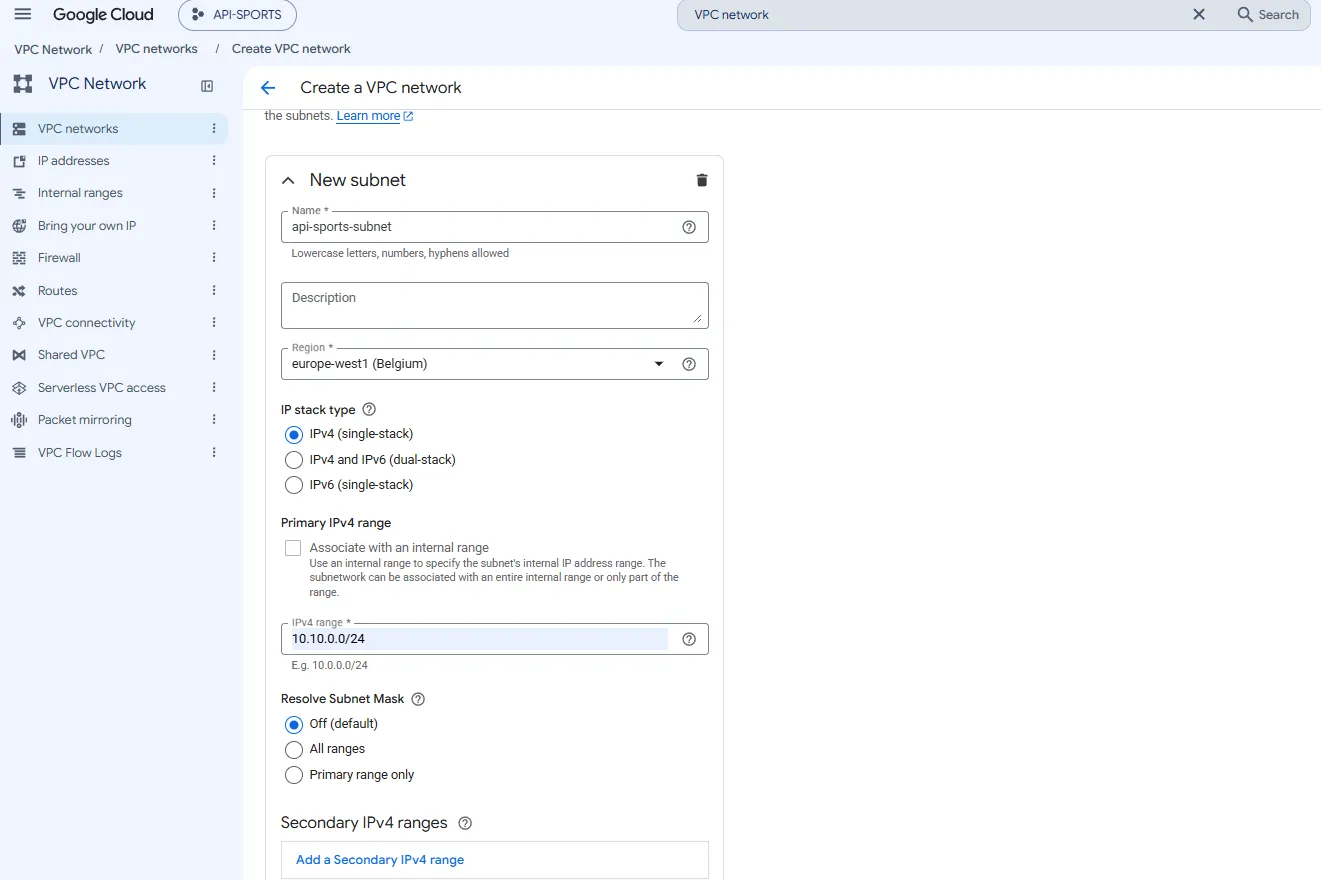
 In the subnet section, use the following values:
| Field | Value |
|---|---|
| Name | api-sports-subnet |
| Region | europe-west1 |
| IP stack | IPv4 |
| Associate with an internal range | Disabled |
| IPv4 range | 10.10.0.0/24 |
| Resolve Subnet Mask | Off |
| Private Google Access | Off |
| Flow logs | Off |
| Hybrid Subnets | Off |
When all the fields are completed, click Create. Wait for the operation to finish before continuing.
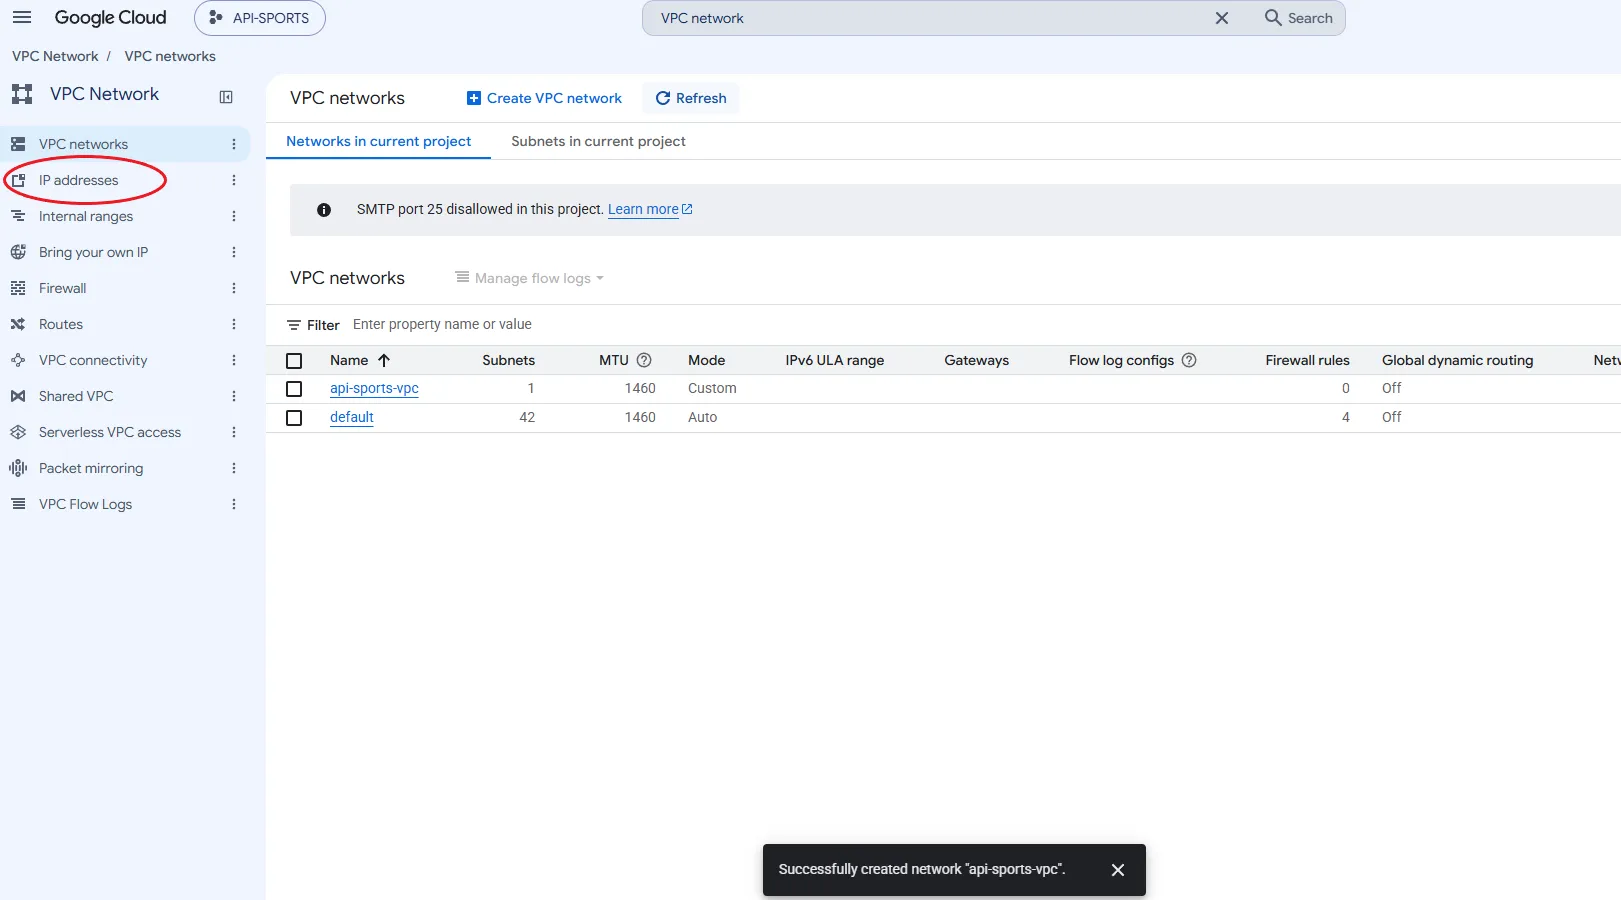
Google Cloud automatically opens the page for the new network. The following message confirms that the step was successful: Successfully created network "api-sports-vpc".
Stay on this page. In the menu on the left, click IP addresses to move to the next step.
Step 2: Reserve a static external IP
On the IP addresses page, click Reserve external. Then complete the form with the following values:
| Field | Value |
|---|---|
| Name | api-sports-egress-ip |
| Description | API-SPORTS static egress IP. |
| Network Service Tier | Premium |
| IP version | IPv4 |
| Type | Regional |
| Region | europe-west1 |
| Source | None |
| Attached to | None |
The address does not need to be attached to a virtual machine at this stage. It will be used later by Cloud NAT.
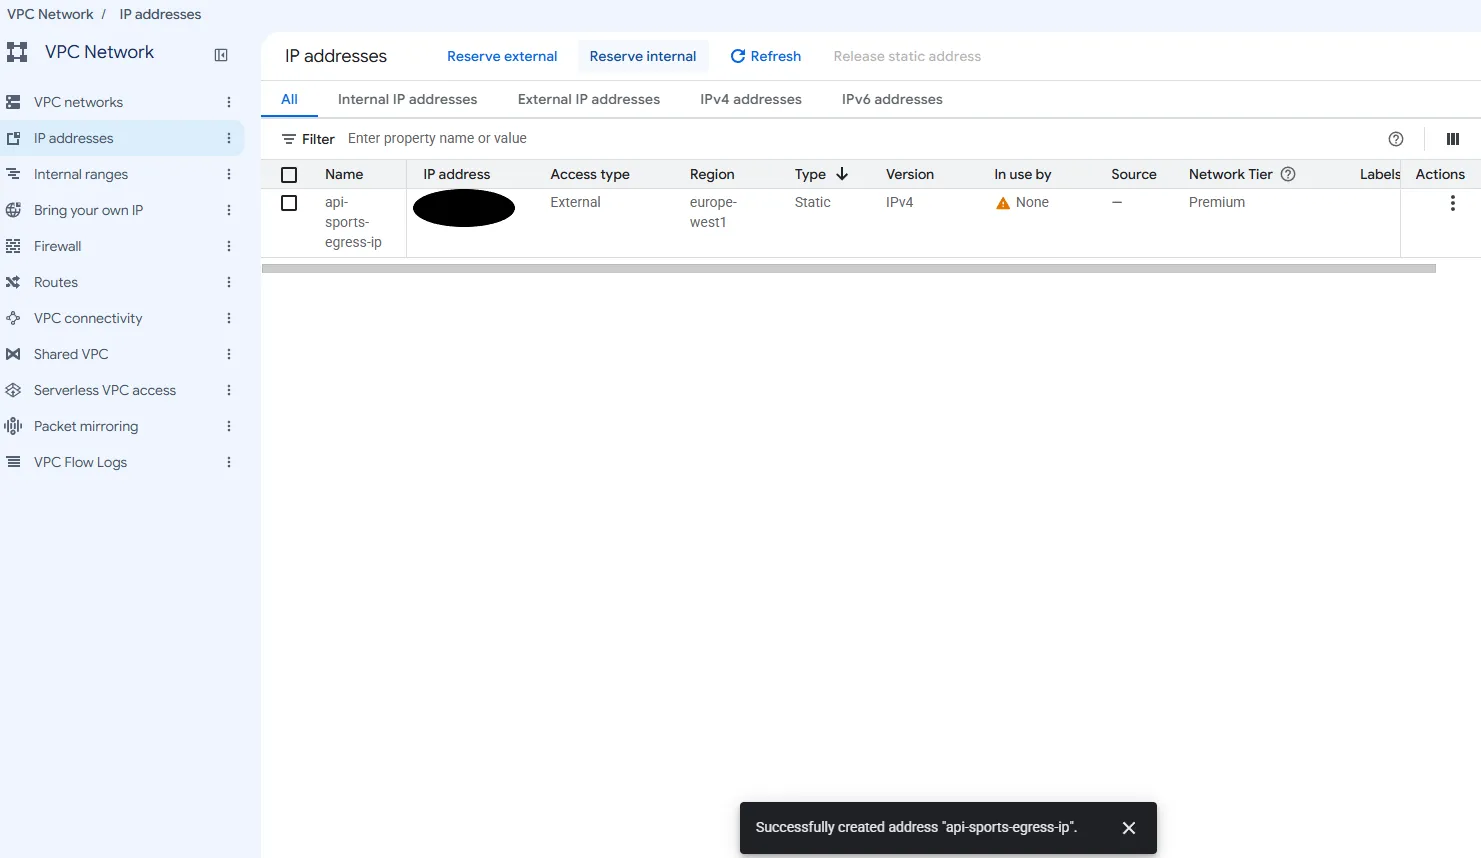
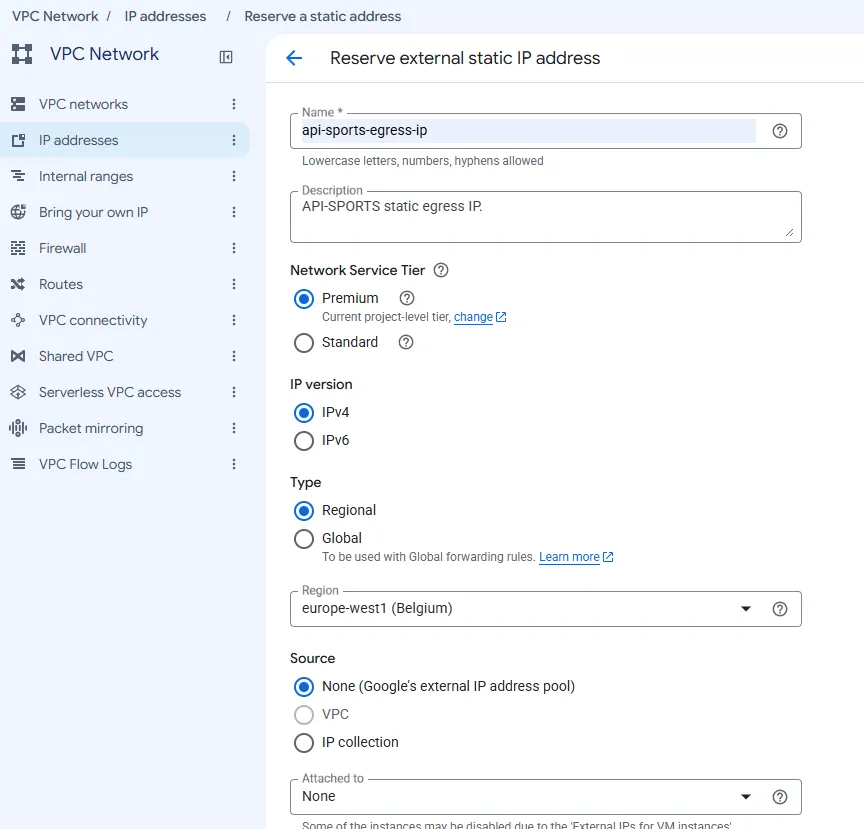 Click Reserve. Google Cloud then assigns a public IPv4 address to
api-sports-egress-ip and displays the message: Successfully created address "api-sports-egress-ip".
This address will be the one API-SPORTS sees for requests forwarded by the proxy. Note its name, but do not publish its actual value if you do not want to expose your infrastructure’s address.
Step 3: Configure Cloud NAT
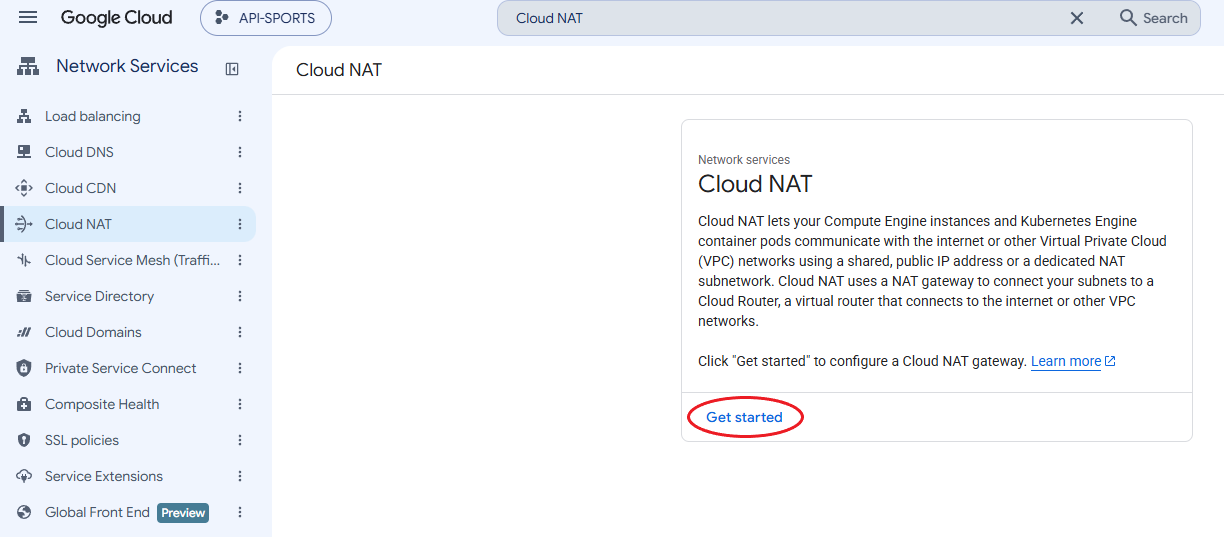
Use the Google Cloud search bar again. Enter Cloud NAT, select the corresponding product, then click Get started.
 Start the form with the following settings:
| Field | Value |
|---|---|
| Name | api-sports-nat |
| NAT type | Public |
| Network | api-sports-vpc |
| Region | europe-west1 |
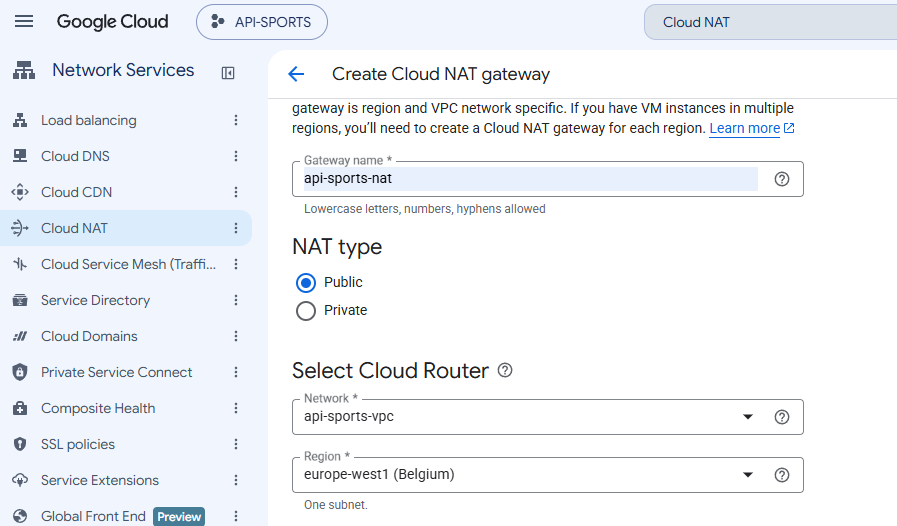 Under Select Cloud Router, choose Create new router. A panel titled Create a router opens on the right. Enter
api-sports-router in Name, then click Create in this panel.
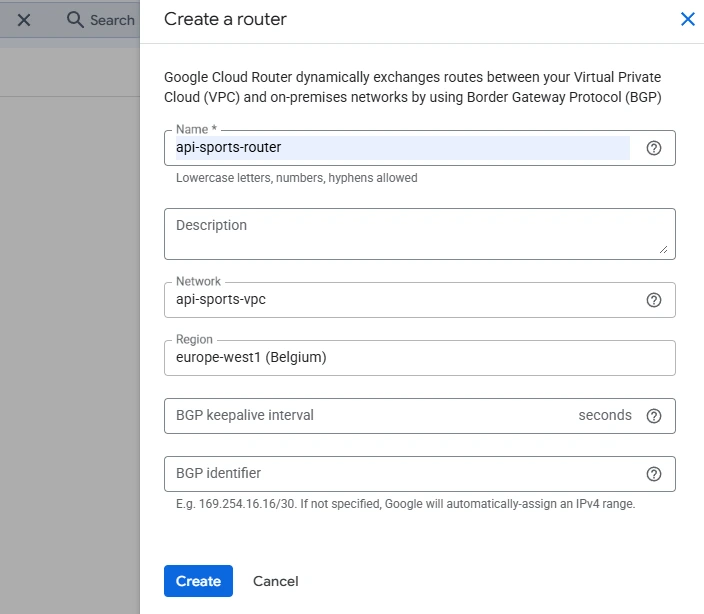 The panel closes, and you return to the Cloud NAT form with the new router selected.
Then configure the Cloud NAT mapping:
| Field | Value |
|---|---|
| Source endpoint type | VM instances, GKE nodes, Serverless |
| Source IP version | IPv4 subnet ranges |
| Source subnets | Custom |
| Subnet | api-sports-subnet |
| IP ranges | 10.10.0.0/24 only |
Under IP ranges, deselect All primary, then select only the subnet’s 10.10.0.0/24 range.
Complete the configuration with the following settings:
| Field | Value |
|---|---|
| Cloud NAT IP addresses | Manual |
| Customized rules | No rule to add |
| Network Service Tier | Premium |
| IP address 1 | api-sports-egress-ip |
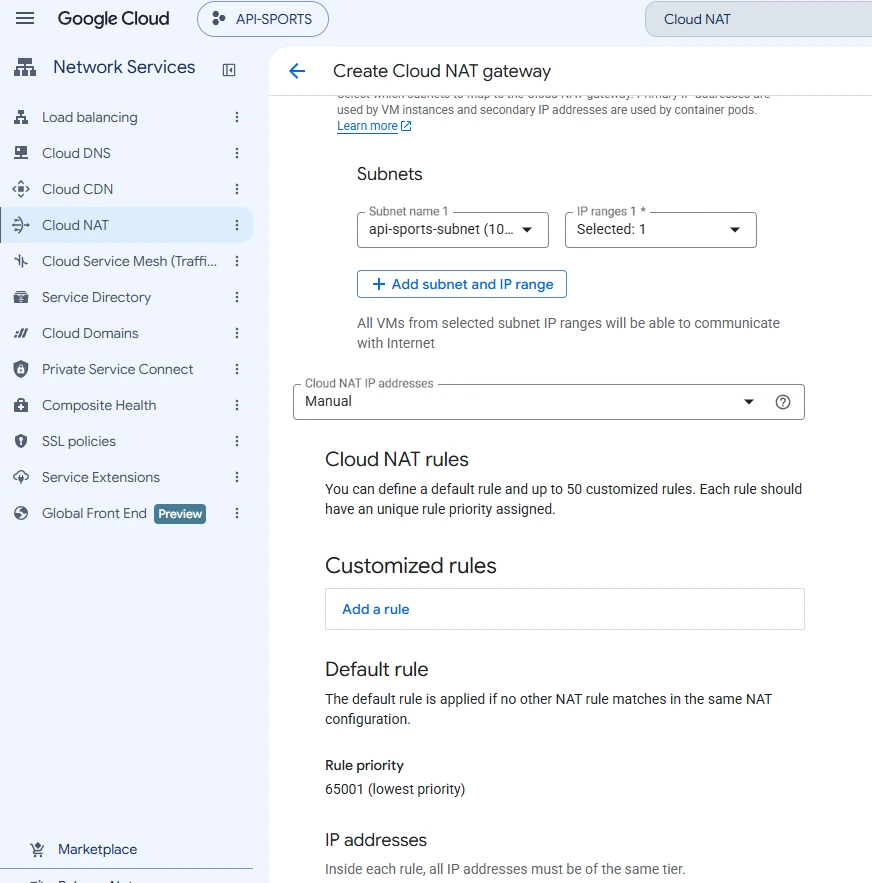
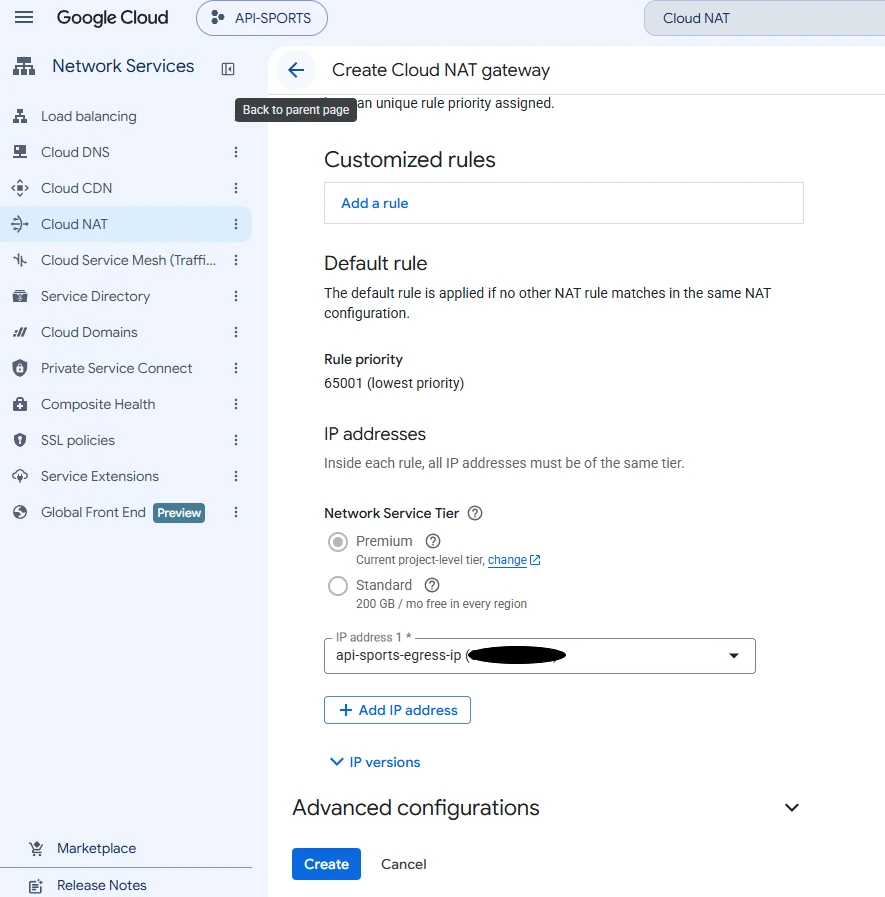 You do not need to add a custom NAT rule. The default configuration can use the reserved static address. Leave the other advanced settings at their default values unless your infrastructure requires a specific configuration.
Click Create. Once the gateway has been created, make sure its status is Running and that a green indicator appears. Do not continue until this status is visible.
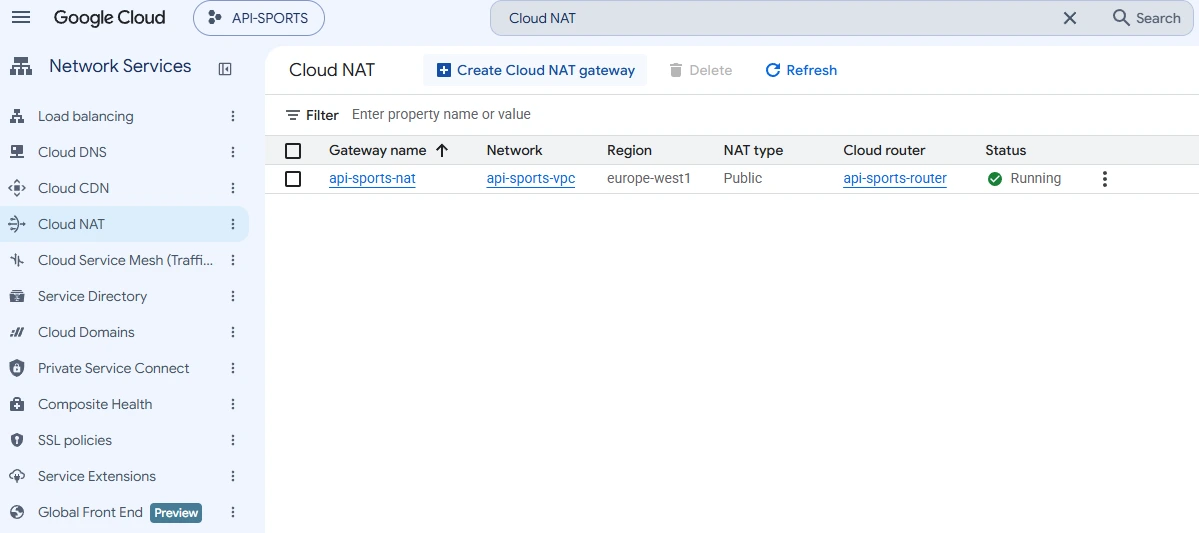 Cloud NAT is now configured to use
api-sports-egress-ip with outbound traffic from the selected subnet.
Step 4: Create the Cloud Run proxy
Search for Cloud Run in the top bar, open the corresponding product, then click Create service.
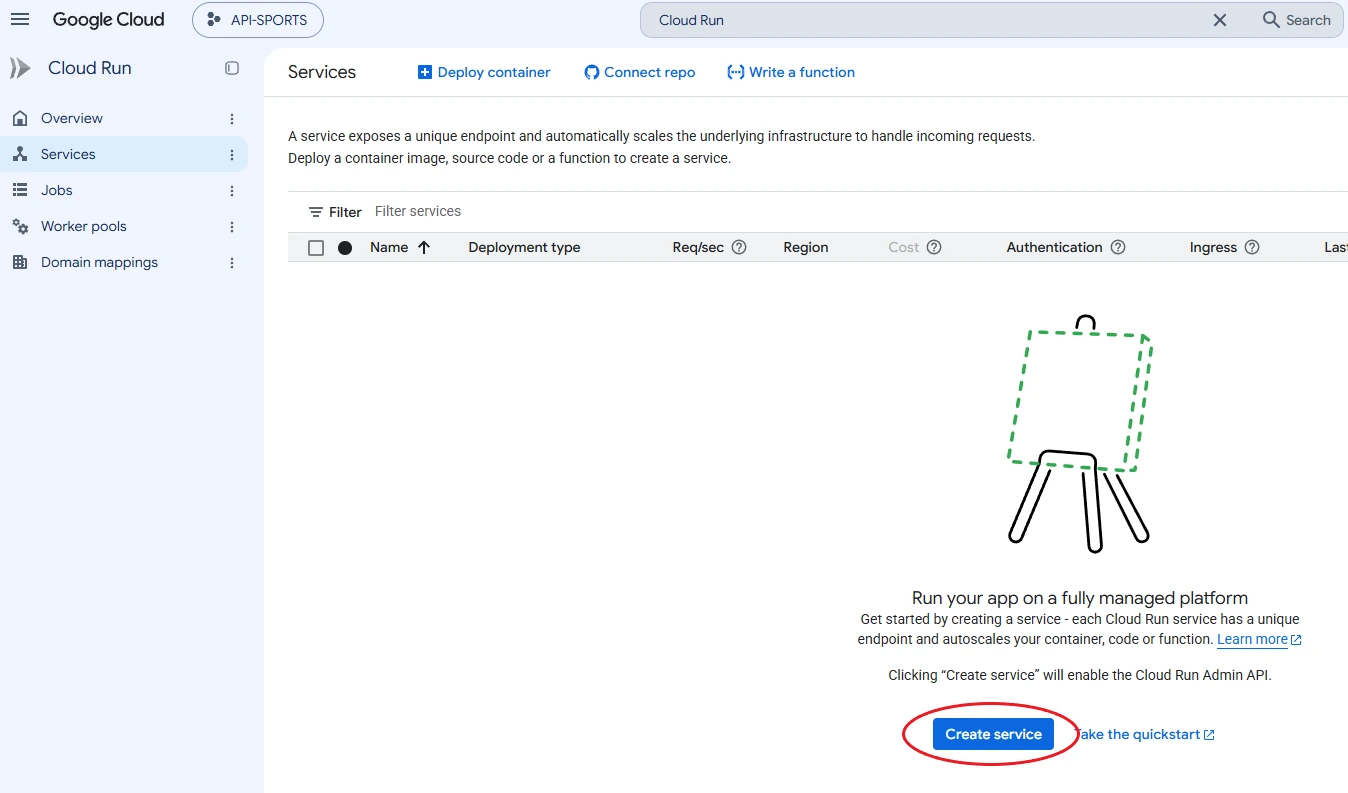 Select Function - Use an inline editor to create a function. Then complete the main settings:
| Field | Value |
|---|---|
| Name | api-sports-proxy |
| Region | europe-west1 |
| Runtime | Node.js 22 |
| Authentication | Allow public access |
| Billing | Request-based |
| Service scaling | Keep the proposed configuration |
| Minimum instances | 0 |
| Ingress | All |
The Allow public access option makes the Cloud Run URL accessible. However, it does not make the proxy freely usable because we will add a private token in the next step.
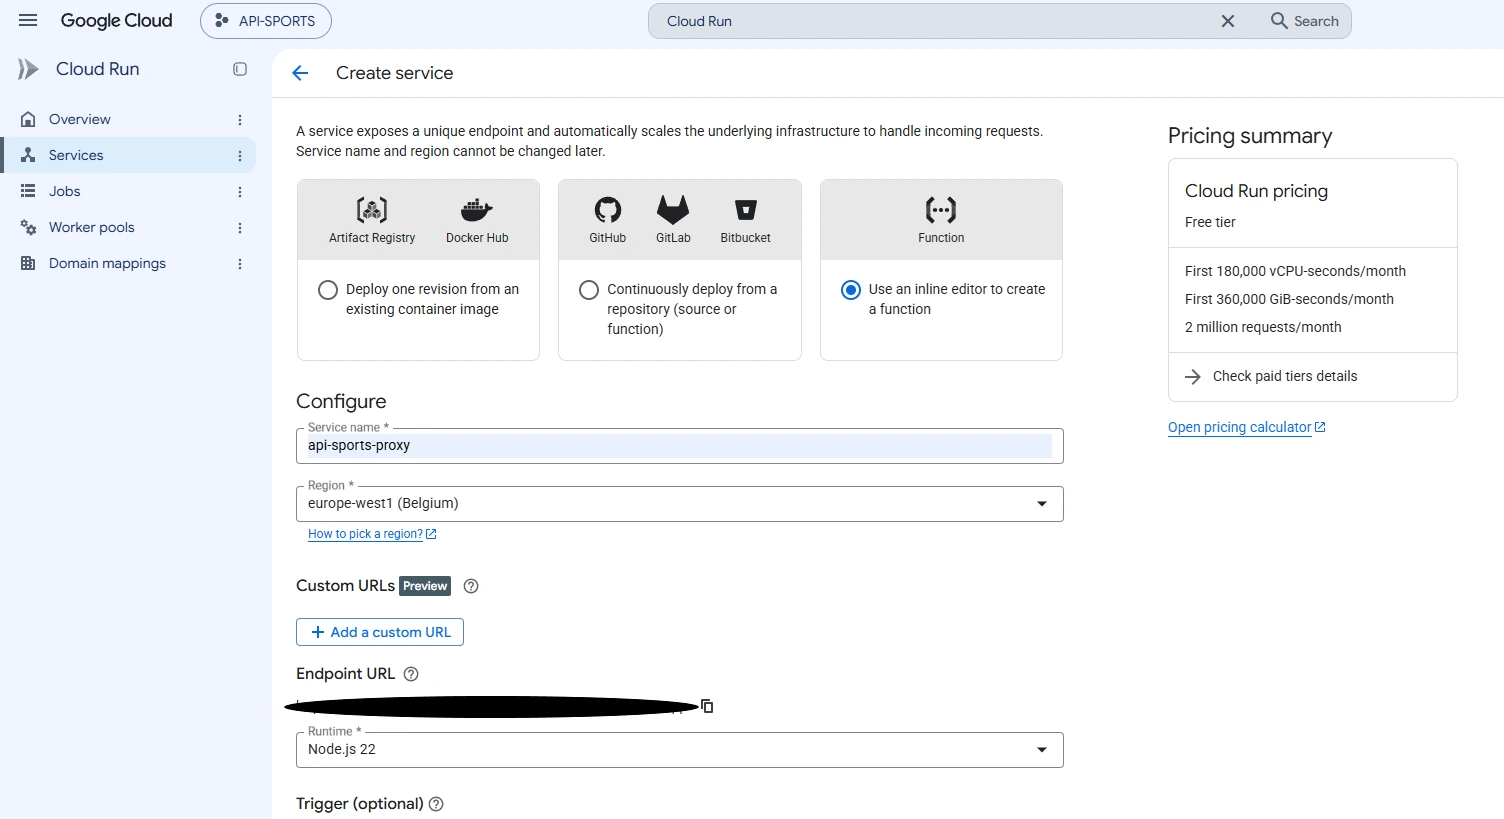
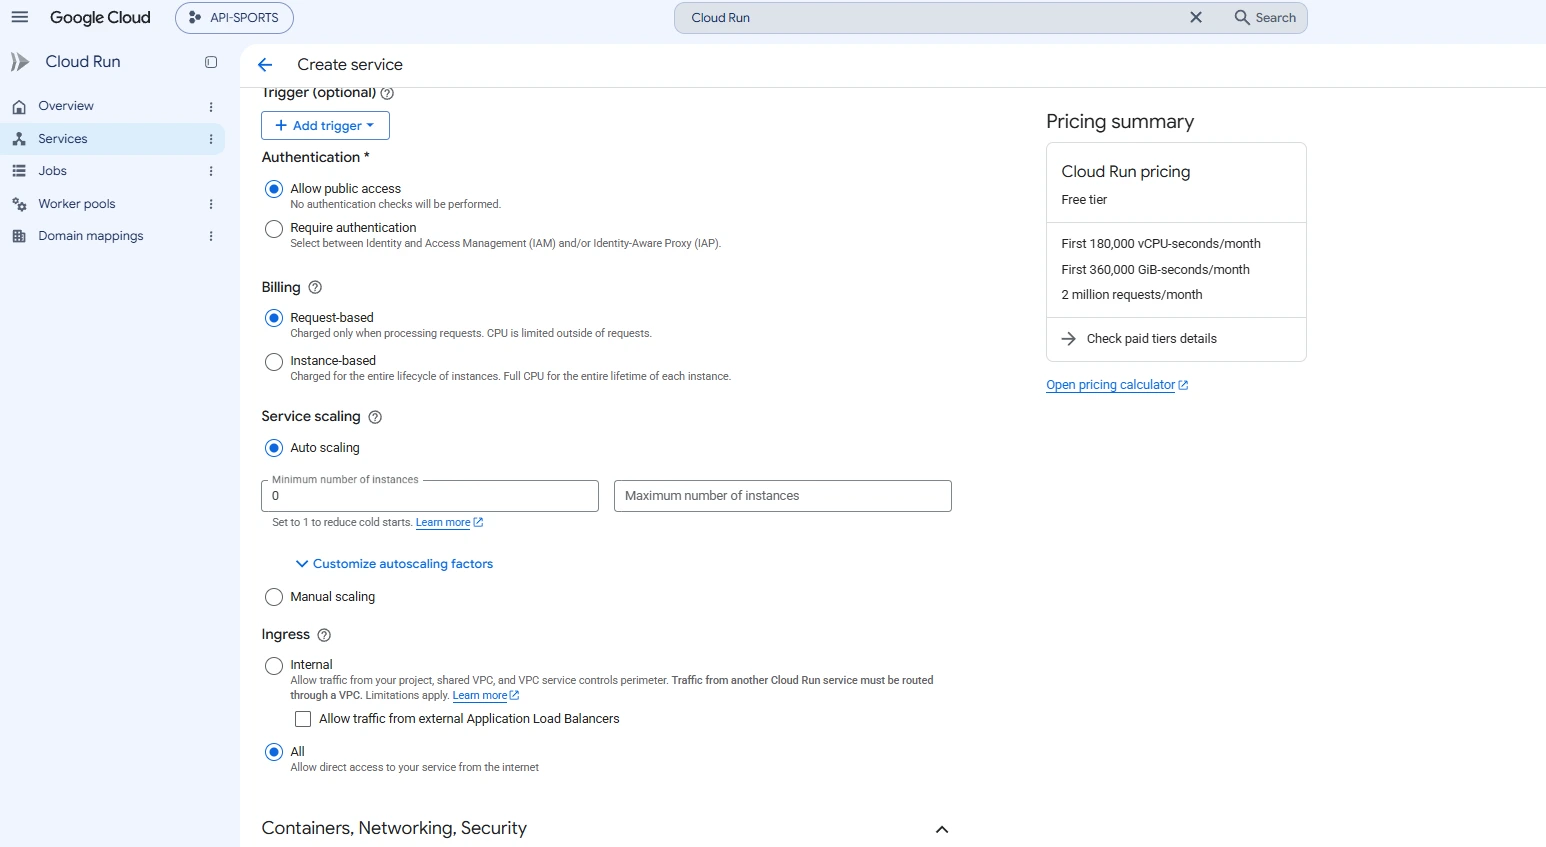 Open the Containers, Networking, Security section, then the Networking tab. Configure the network egress as follows:
- Enable Connect to a VPC for outbound traffic
- Keep Send traffic directly to a VPC
- Select the
api-sports-vpcnetwork - Select the
api-sports-subnetsubnet - Under Traffic routing, select Route all traffic to the VPC
Do not select Route only requests to private IPs to the VPC.
API-SPORTS is accessible over the Internet. Cloud Run must therefore send all outbound traffic to the VPC so that Cloud NAT applies the static IP address to it. You do not need to enable Join a service mesh.
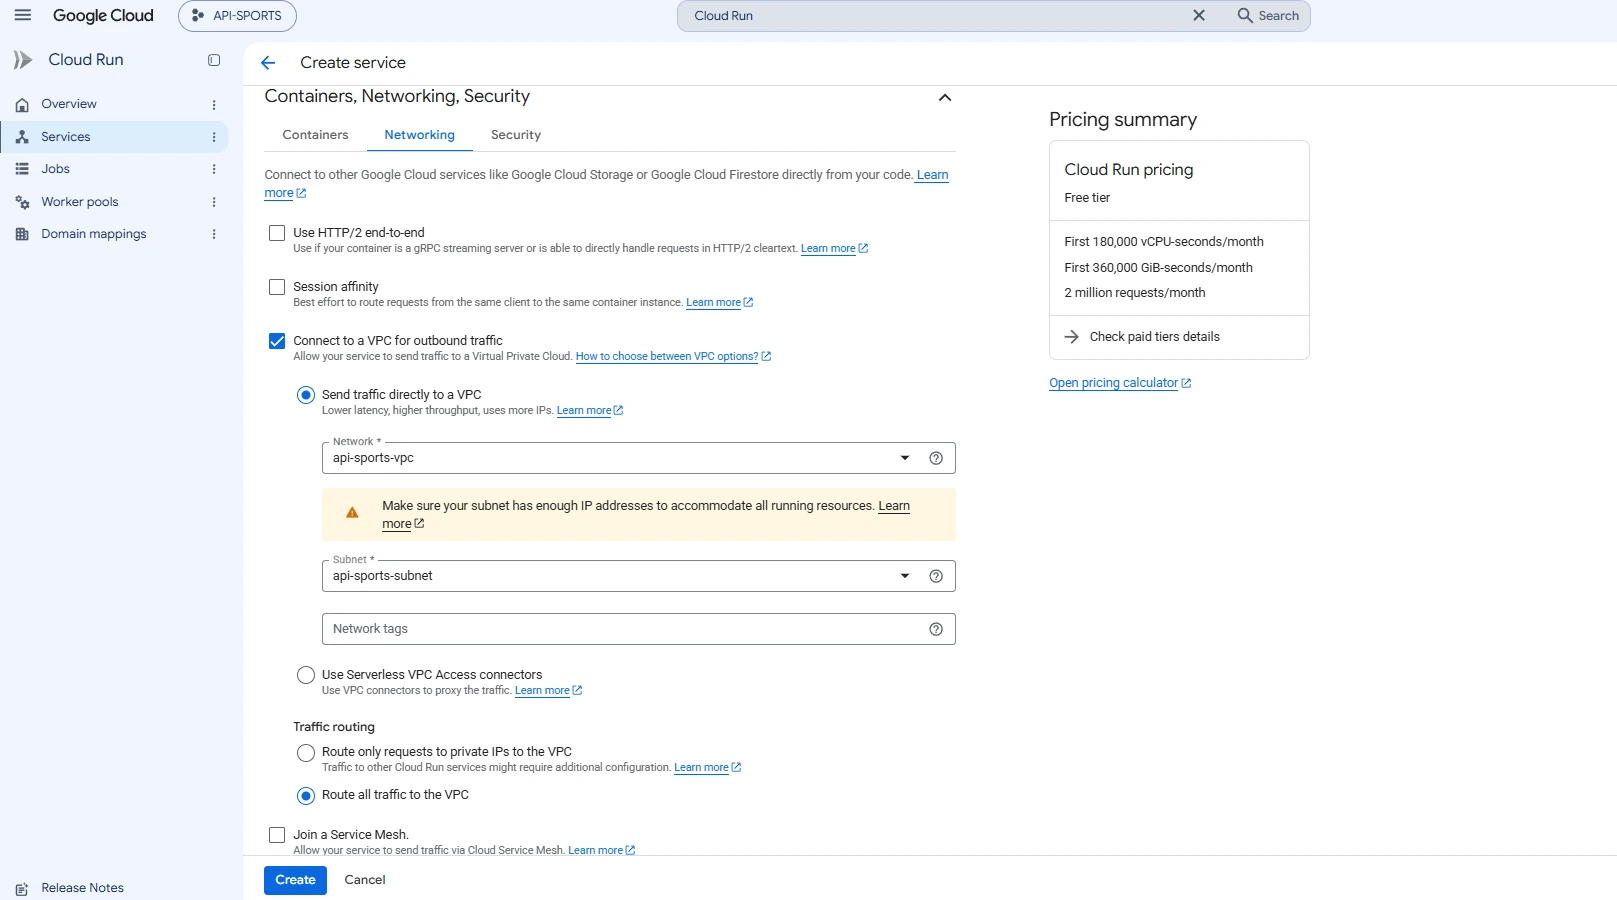 Click Create. Google Cloud may display an Enable APIs window with the following message:
You need to enable the following APIs to use Cloud Run functions
If this window appears, click Enable. This request is normal and may include the APIs required for Cloud Run Functions and Cloud Build. It does not appear if they are already enabled in your project.
Google Cloud then opens the page for the api-sports-proxy service. Before continuing, make sure the following operations display Completed with a green indicator:
- Creating service
- Creating revision
- Routing traffic
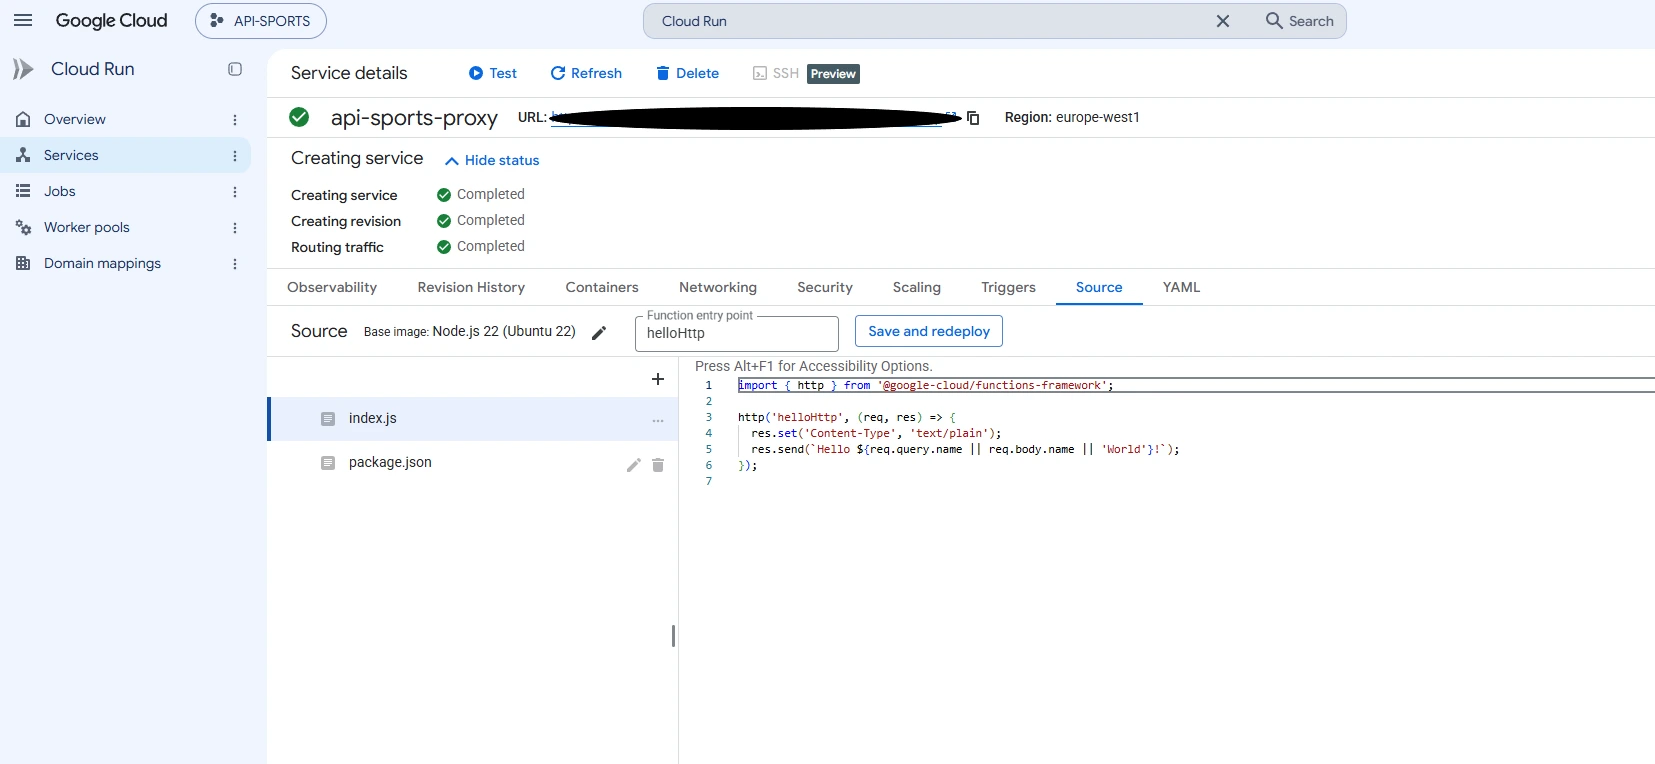
Step 5: Create and secure the API-SPORTS proxy
Stay on the api-sports-proxy service page. The Source tab is normally displayed automatically. The editor already contains sample code. Select all of it and replace it with the following code:
import { http } from '@google-cloud/functions-framework';

const API_BASE = 'https://v3.football.api-sports.io';

http('apiSportsProxy', async (req, res) => {
  if (req.method !== 'GET') {
    return res.status(405).send('Method not allowed');
  }

  const proxyToken = process.env.PROXY_TOKEN;

  if (!proxyToken || req.get('authorization') !== `Bearer ${proxyToken}`) {
    return res.status(401).send('Unauthorized');
  }

  try {
    const targetUrl = new URL(req.originalUrl, API_BASE);

    const response = await fetch(targetUrl, {
      headers: {
        'x-apisports-key': process.env.API_SPORTS_KEY,
      },
    });

    const body = await response.text();

    res.status(response.status);
    res.set(
      'Content-Type',
      response.headers.get('content-type') || 'application/json'
    );

    return res.send(body);
  } catch (error) {
    console.error(error);
    return res.status(502).send('Unable to reach API-SPORTS');
  }
});
This example uses the API-FOOTBALL base URL. To use the proxy with another API-SPORTS product, replace API_BASE with the corresponding base URL and adapt the endpoints called.
Above the editor, replace the Function entry point value with:
apiSportsProxy
This value must exactly match the name passed to http('apiSportsProxy', ...) in the code.
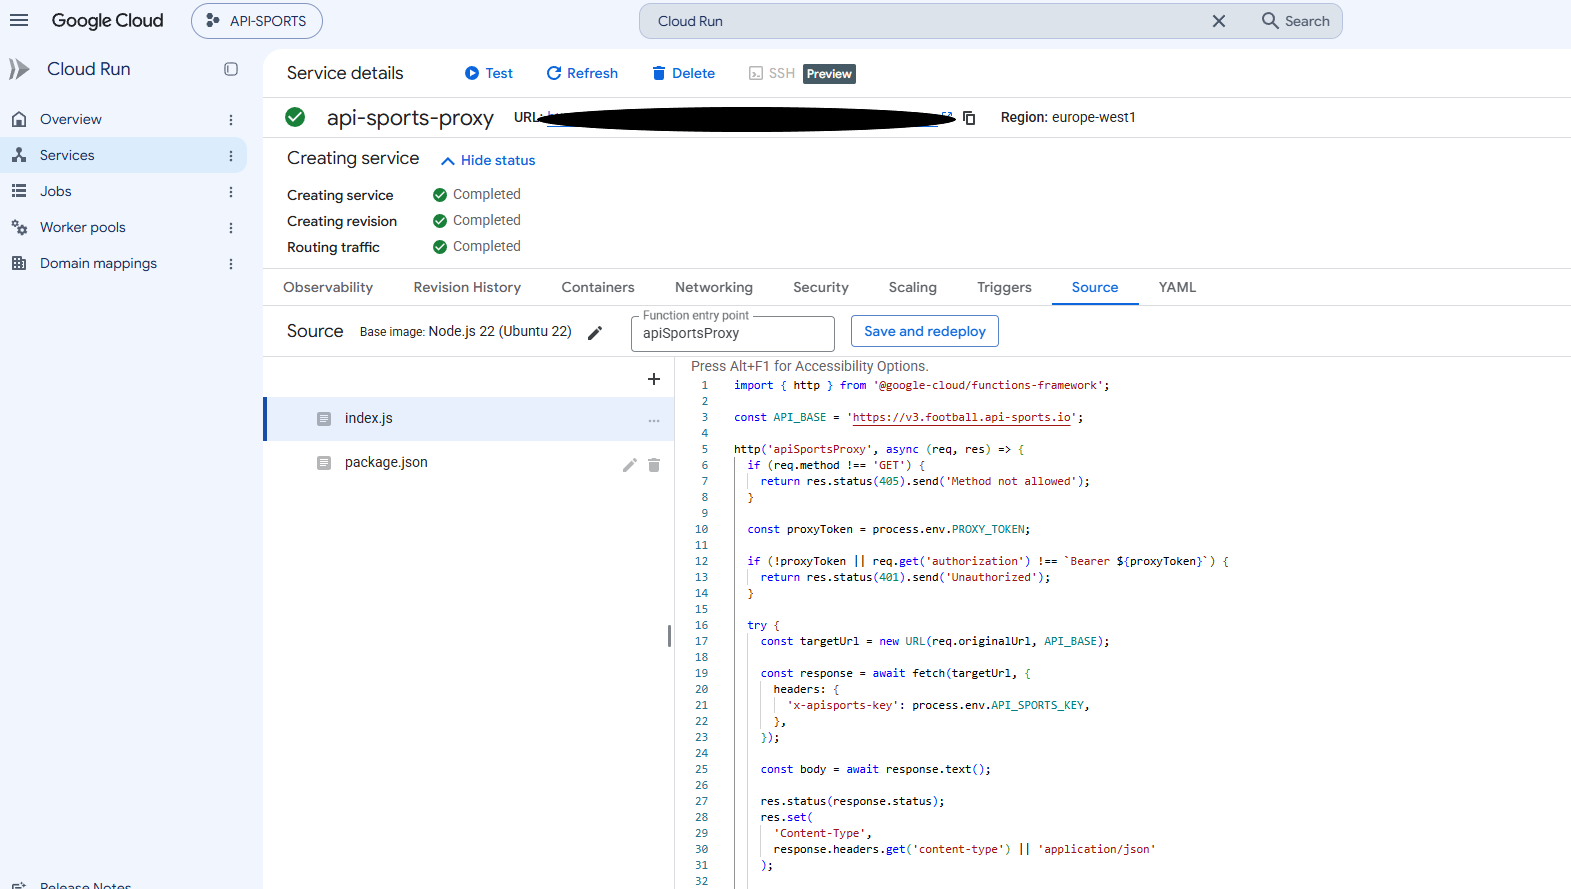 Click Save and redeploy. This action creates a new revision. Wait for the deployment and traffic routing to complete before continuing. A confirmation message may also appear in the bottom-right corner.
Add the API key and the proxy token
Stay on the service page, then open the Containers tab. In the Variables & Secrets section, click + Add variable twice.
Add the following two variables:
| Name | Value |
|---|---|
API_SPORTS_KEY |
Your API-SPORTS key |
PROXY_TOKEN |
A long, random, and confidential string |
The names are case-sensitive. They must exactly match process.env.API_SPORTS_KEY and process.env.PROXY_TOKEN in the code.
The two values do not have the same role. API_SPORTS_KEY allows the proxy to authenticate with API-SPORTS. PROXY_TOKEN allows your application to authenticate with the proxy.
Create PROXY_TOKEN with a secure random-string generator or with a password manager’s generator. Do not use an easy-to-guess expression, and do not reuse your API-SPORTS key. Keep both values private.
For production use, you can also store sensitive values in Google Secret Manager, then reference them from Containers → Variables & Secrets.
Once both variables have been entered, click View diff & redeploy in the top-right corner.
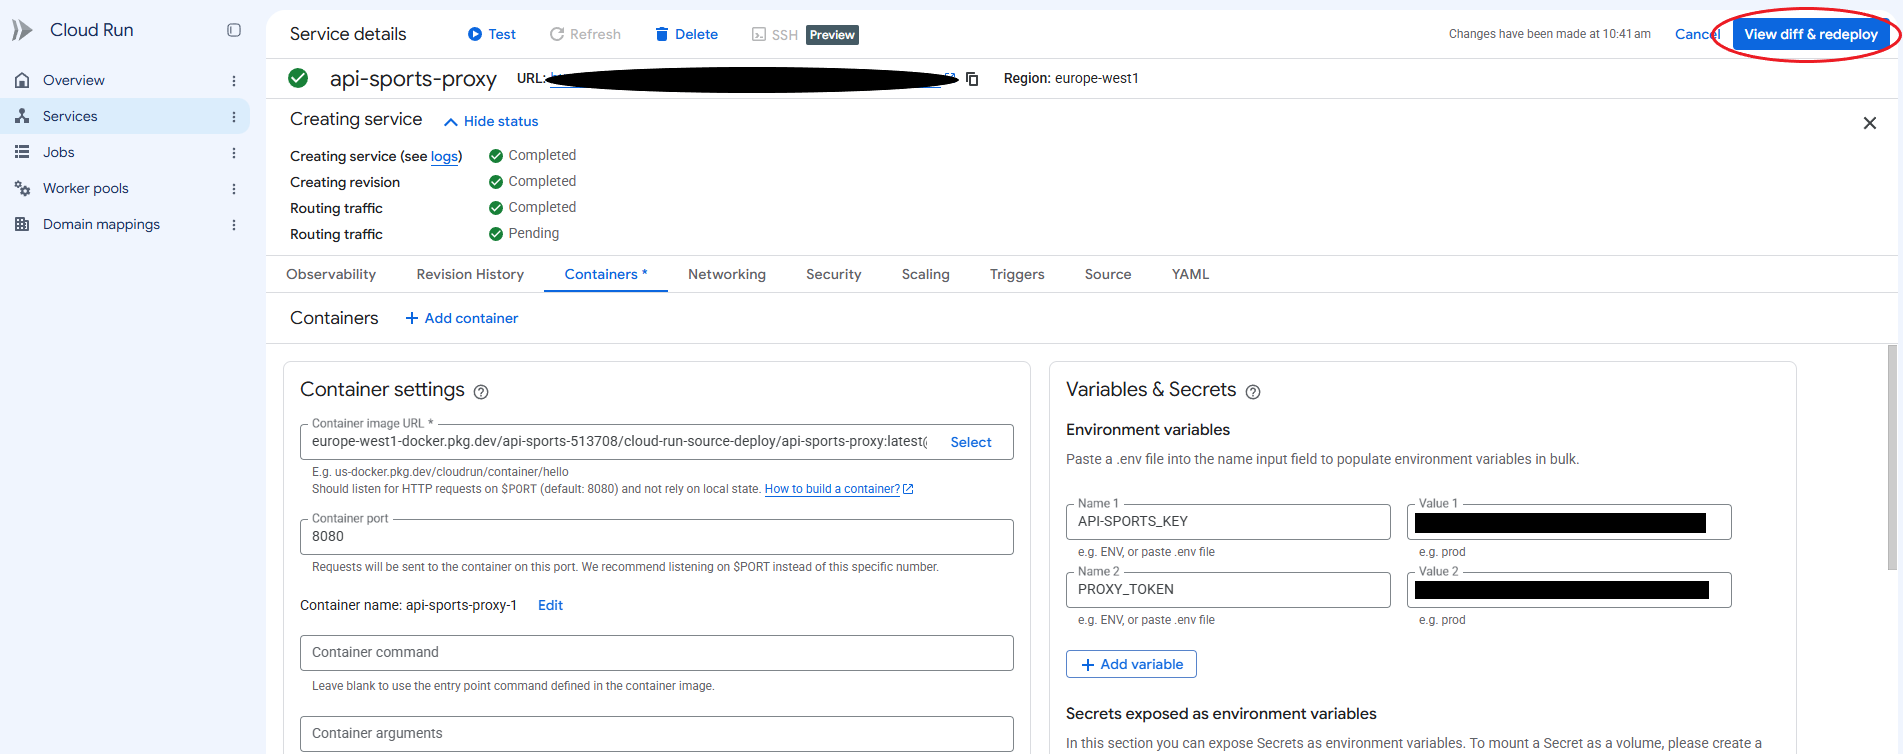 During the initial configuration, the summary displays
Current: None, followed by the two new variables under New. Leave Serve this revision immediately selected, then click Deploy changes.
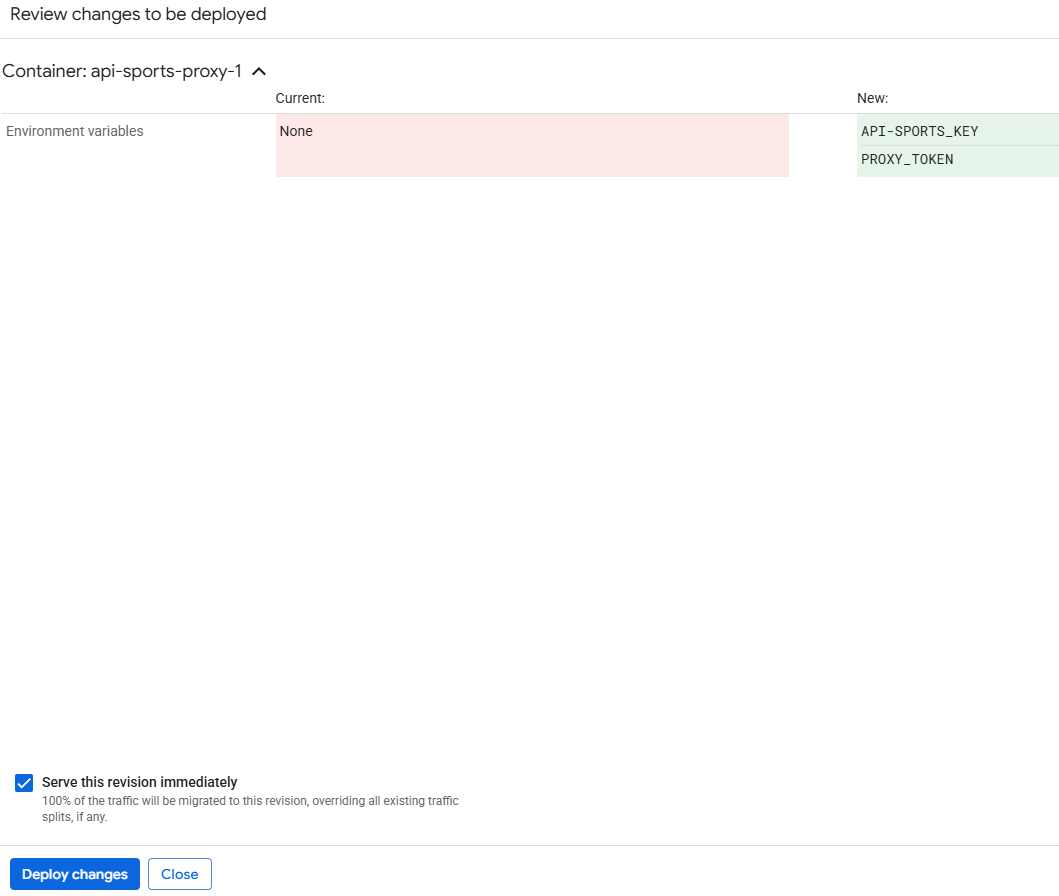 Wait until the new revision is active and traffic routing is complete.
Your application will now call the proxy with the following header:
Authorization: Bearer YOUR_PROXY_TOKEN
The word Bearer and the space after it must be retained. The proxy then adds API_SPORTS_KEY internally when forwarding the request to API-SPORTS. Someone who discovers the Cloud Run URL therefore cannot use the proxy without knowing the token.
Test the proxy using /status
Open a terminal or command-line application. On Windows, you can use Command Prompt, PowerShell, or Windows Terminal. On macOS and Linux, open the Terminal application.
On the Cloud Run page, copy the service URL displayed at the top using the dedicated icon.
In the following command, replace YOUR_PROXY_TOKEN with the token defined in the PROXY_TOKEN variable. Replace https://YOUR_CLOUD_RUN_URL with the copied URL. It already contains https://, so you must not add it a second time:
curl -i ^
  -H "Authorization: Bearer YOUR_PROXY_TOKEN" ^
  "https://YOUR_CLOUD_RUN_URL/status"
For macOS, Linux, or a terminal that accepts a command on a single line:
curl -i -H "Authorization: Bearer YOUR_PROXY_TOKEN" "https://YOUR_CLOUD_RUN_URL/status"
The ^ character continues the command on the next line in Windows Command Prompt. It must remain at the end of the line, with no additional character after it. In PowerShell, use the command on a single line with curl.exe if curl is interpreted as an alias.
Press Enter. If the configuration works, the terminal returns the information from the /status endpoint, just as it does for a call made from the dashboard’s Live Tester. The JSON may appear on a single line and seem difficult to read. This does not mean that the request failed.
The -i option also displays the HTTP status and headers. A valid response containing the expected data confirms that the Cloud Run URL is accessible, the token is accepted, the proxy reads the API key, and it correctly forwards the request to API-SPORTS.
After this verification, you can close the terminal.
More advanced authentication
If your application already uses Google Cloud identity mechanisms, you can replace the custom token with Cloud Run IAM authentication.
Cloud Run supports service-to-service authentication with identity tokens signed by Google. This method offers more advanced access control without requiring you to manage a shared secret.
For a simple backend integration, however, a private proxy token remains easier to configure.
Step 6: Verify the outbound IP
The previous test confirms that the proxy responds. This final step verifies that requests actually leave Google Cloud using the reserved static address.
Open your terminal again and reuse the command used for /status. Replace /status with the following endpoint:
curl -i ^
  -H "Authorization: Bearer YOUR_PROXY_TOKEN" ^
  "https://YOUR_CLOUD_RUN_URL/fixtures?date=YYYY-MM-DD"
For macOS, Linux, PowerShell, or any terminal that accepts a command on a single line, use:
curl -i -H "Authorization: Bearer YOUR_PROXY_TOKEN" "https://YOUR_CLOUD_RUN_URL/fixtures?date=YYYY-MM-DD"
Replace YYYY-MM-DD with the current date suggested in the Live Tester, using the format expected by the API.
Run the command. The response may be long depending on the number of matches scheduled that day. As with /status, the JSON may be minified in the terminal.
Then open the Requests page of the API-FOOTBALL dashboard. This example uses API-FOOTBALL, but a request history is also available for the other API-SPORTS products.
Scroll down to Today Requests, locate the /fixtures request you just made, and note the IP address associated with it.
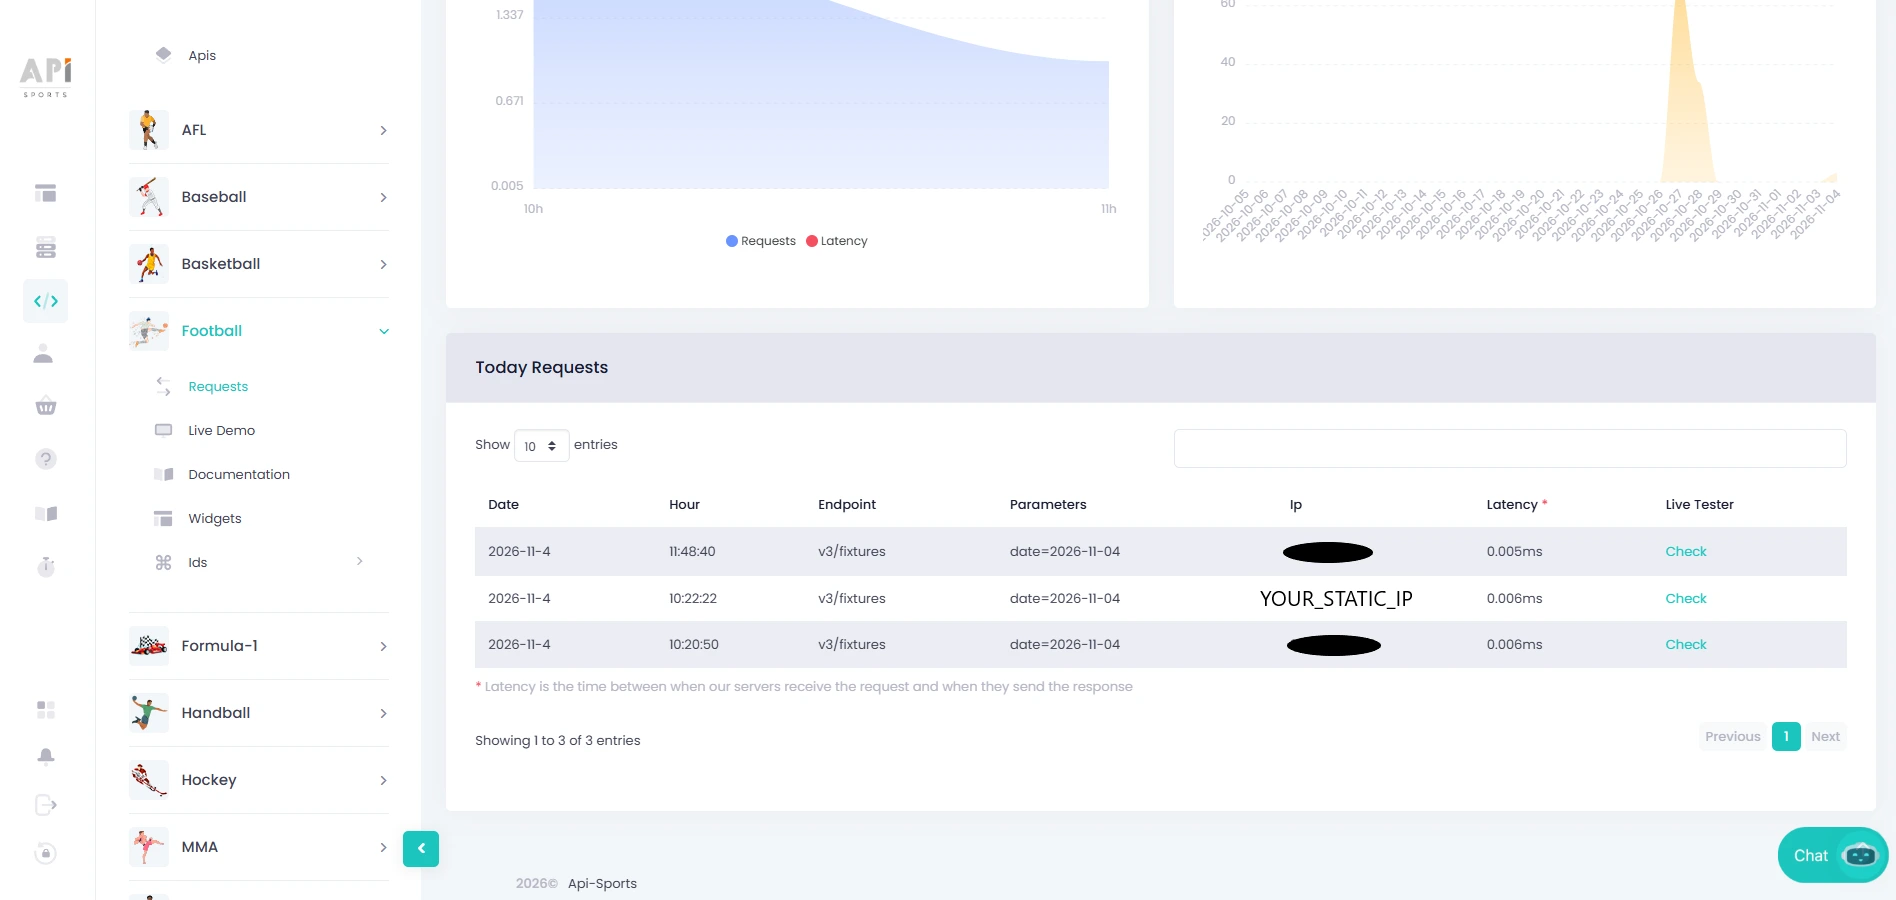 Return to the
API-SPORTS Google Cloud project, open VPC network, then IP addresses. Locate api-sports-egress-ip and note its IPv4 address.
 Compare the two values:
| Location | Address to verify |
|---|---|
API-SPORTS dashboard → Today Requests → /fixtures request |
IP detected for the request |
Google Cloud → VPC network → IP addresses → api-sports-egress-ip |
Reserved static IP |
The two addresses must be identical. If they match, the request followed the intended path:
Cloud Run → VPC → Cloud NAT → static IP → Internet
The configuration is then validated. Your API-SPORTS requests will use this same outbound IP address as long as the proxy and network resources remain configured in this way.
Alternative: Cloudflare Zero Trust Enterprise
If your infrastructure already uses Cloudflare, you can also use Cloudflare Zero Trust Enterprise with Dedicated Egress IPs.
Dedicated Egress IPs provide static outbound IP addresses assigned to your account. You can create egress rules so that API-SPORTS traffic uses the dedicated address, while the rest of your traffic continues to follow your usual Cloudflare configuration.
The path can then be:
Your application → Cloudflare Gateway → dedicated egress IP → API-SPORTS
Cloudflare describes this configuration in its Dedicated Egress IPs documentation. This feature is offered as an add-on with Cloudflare Zero Trust Enterprise.
Keep the proxy secure
The proxy must never become an unrestricted public relay.
Keep your API key on the server side. Restrict access to the proxy to your application whenever possible. Allow only API-SPORTS destinations and add your own rate limiting if your use case requires it.
The token presented in this guide provides initial protection. For more advanced infrastructure, use IAM, Google Secret Manager, and access rules suited to your architecture.
Do you need to register the IP with API-SPORTS?
No. No registration or prior authorization of the IP address is required.
This configuration is only intended to ensure that your API-SPORTS requests originate from a stable outbound address used by your own infrastructure.
Conclusion
Shared outbound infrastructure can cause rate-limit errors even when your API key still has requests available. It can also lead to the suspension of a Free account when several API-SPORTS users send their requests from the same public address.
The most reliable solution is to route API-SPORTS calls through a clean, static IP address dedicated to your traffic. You can keep your current hosting and create an egress path reserved for API requests:
Your application → Google Cloud Run + VPC + Cloud NAT + static IP → API-SPORTS
Whichever solution you choose, keep the proxy protected, store the API key on the server side, and restrict access to your application. This will help you avoid the main problems associated with shared outbound IP addresses without having to migrate your entire infrastructure.
The API-SPORTS Team